Workflow for Uploading Raw Sequences to NCBI SRA (in progress)
Adding RNASeq and WGBS Sequence Files to NCBI Sequence Read Archive
This workflow follows the NCBI SRA Submission Protocol made by meschedl. I have updated information on the NCBI SRA website from 20210709 and including a section on how to upload sequence files through the URI Andromeda server.
NCBI Archive Structure
BioProject: “A BioProject is a collection of biological data related to a single initiative, originating from a single organization or from a consortium. A BioProject record provides users a single place to find links to the diverse data types generated for that project.” All data and samples from this initiative reside under the one BioProject.
BioSample: “The BioSample database contains descriptions of biological source materials used in experimental assays.” In our work, this is one individual. Multiple different sequence types can come from one individual (RNA, DNA, microbial, etc.) however they all come from a specific individual with specific attributes.
SRA - Sequence Read Archive “Sequence Read Archive (SRA) data, available through multiple cloud providers and NCBI servers, is the largest publicly available repository of high throughput sequencing data. The archive accepts data from all branches of life as well as metagenomic and environmental surveys. SRA stores raw sequencing data and alignment information to enhance reproducibility and facilitate new discoveries through data analysis.” A single SRA submission (or in their language: an EXPERIMENT) is a unique sequencing result for a specific sample. In many of your projects you may have different sequencing results from one sample (RNA, DNA, microbial, etc.).
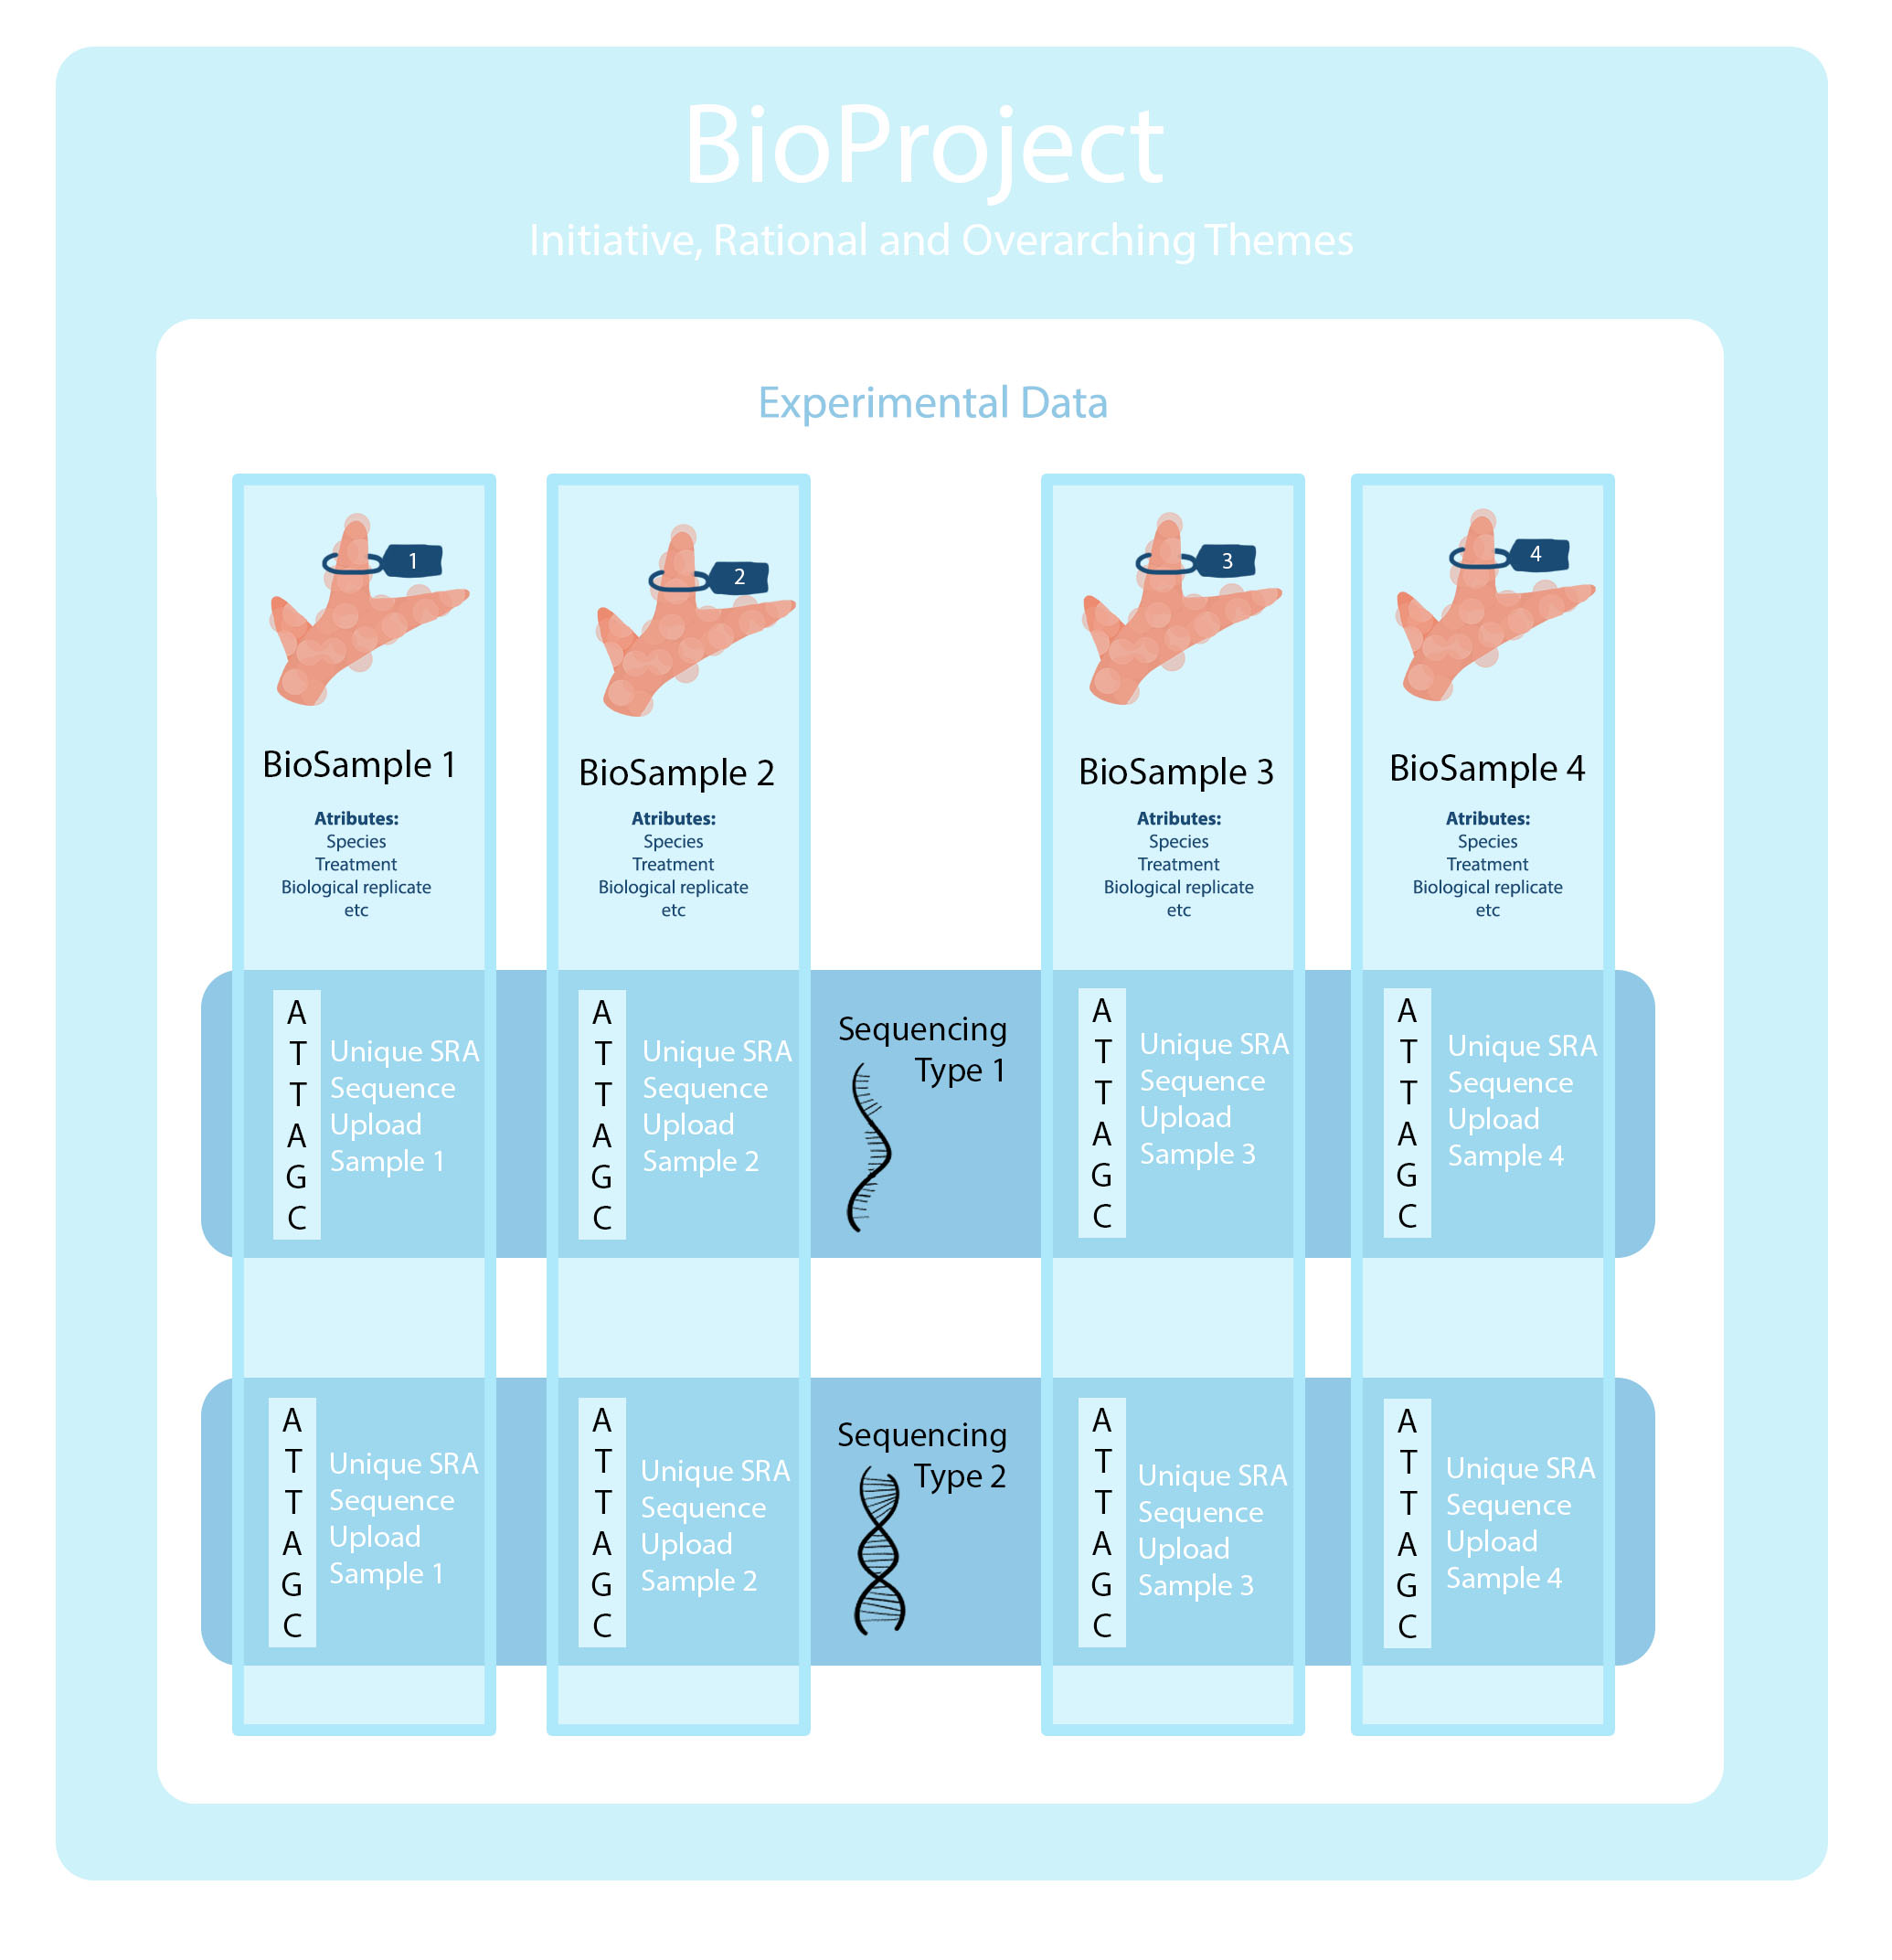
Submission Workflow
It seems intuitive to create a BioProject before making the BioSamples, but if you do that the BioProject portal will take you to make BioSamples, and it won’t let you upload a batch file when it takes you that way. That’s why it is much easier to make the BioSamples before the project. You can add the BioProject accession number to your samples after it is created. It is definitely better to have created both the BioProject and all of your BioSamples for what you are trying to upload before you start the SRA submission process. Like most things, it gets more confusing the more things you try to do at once.
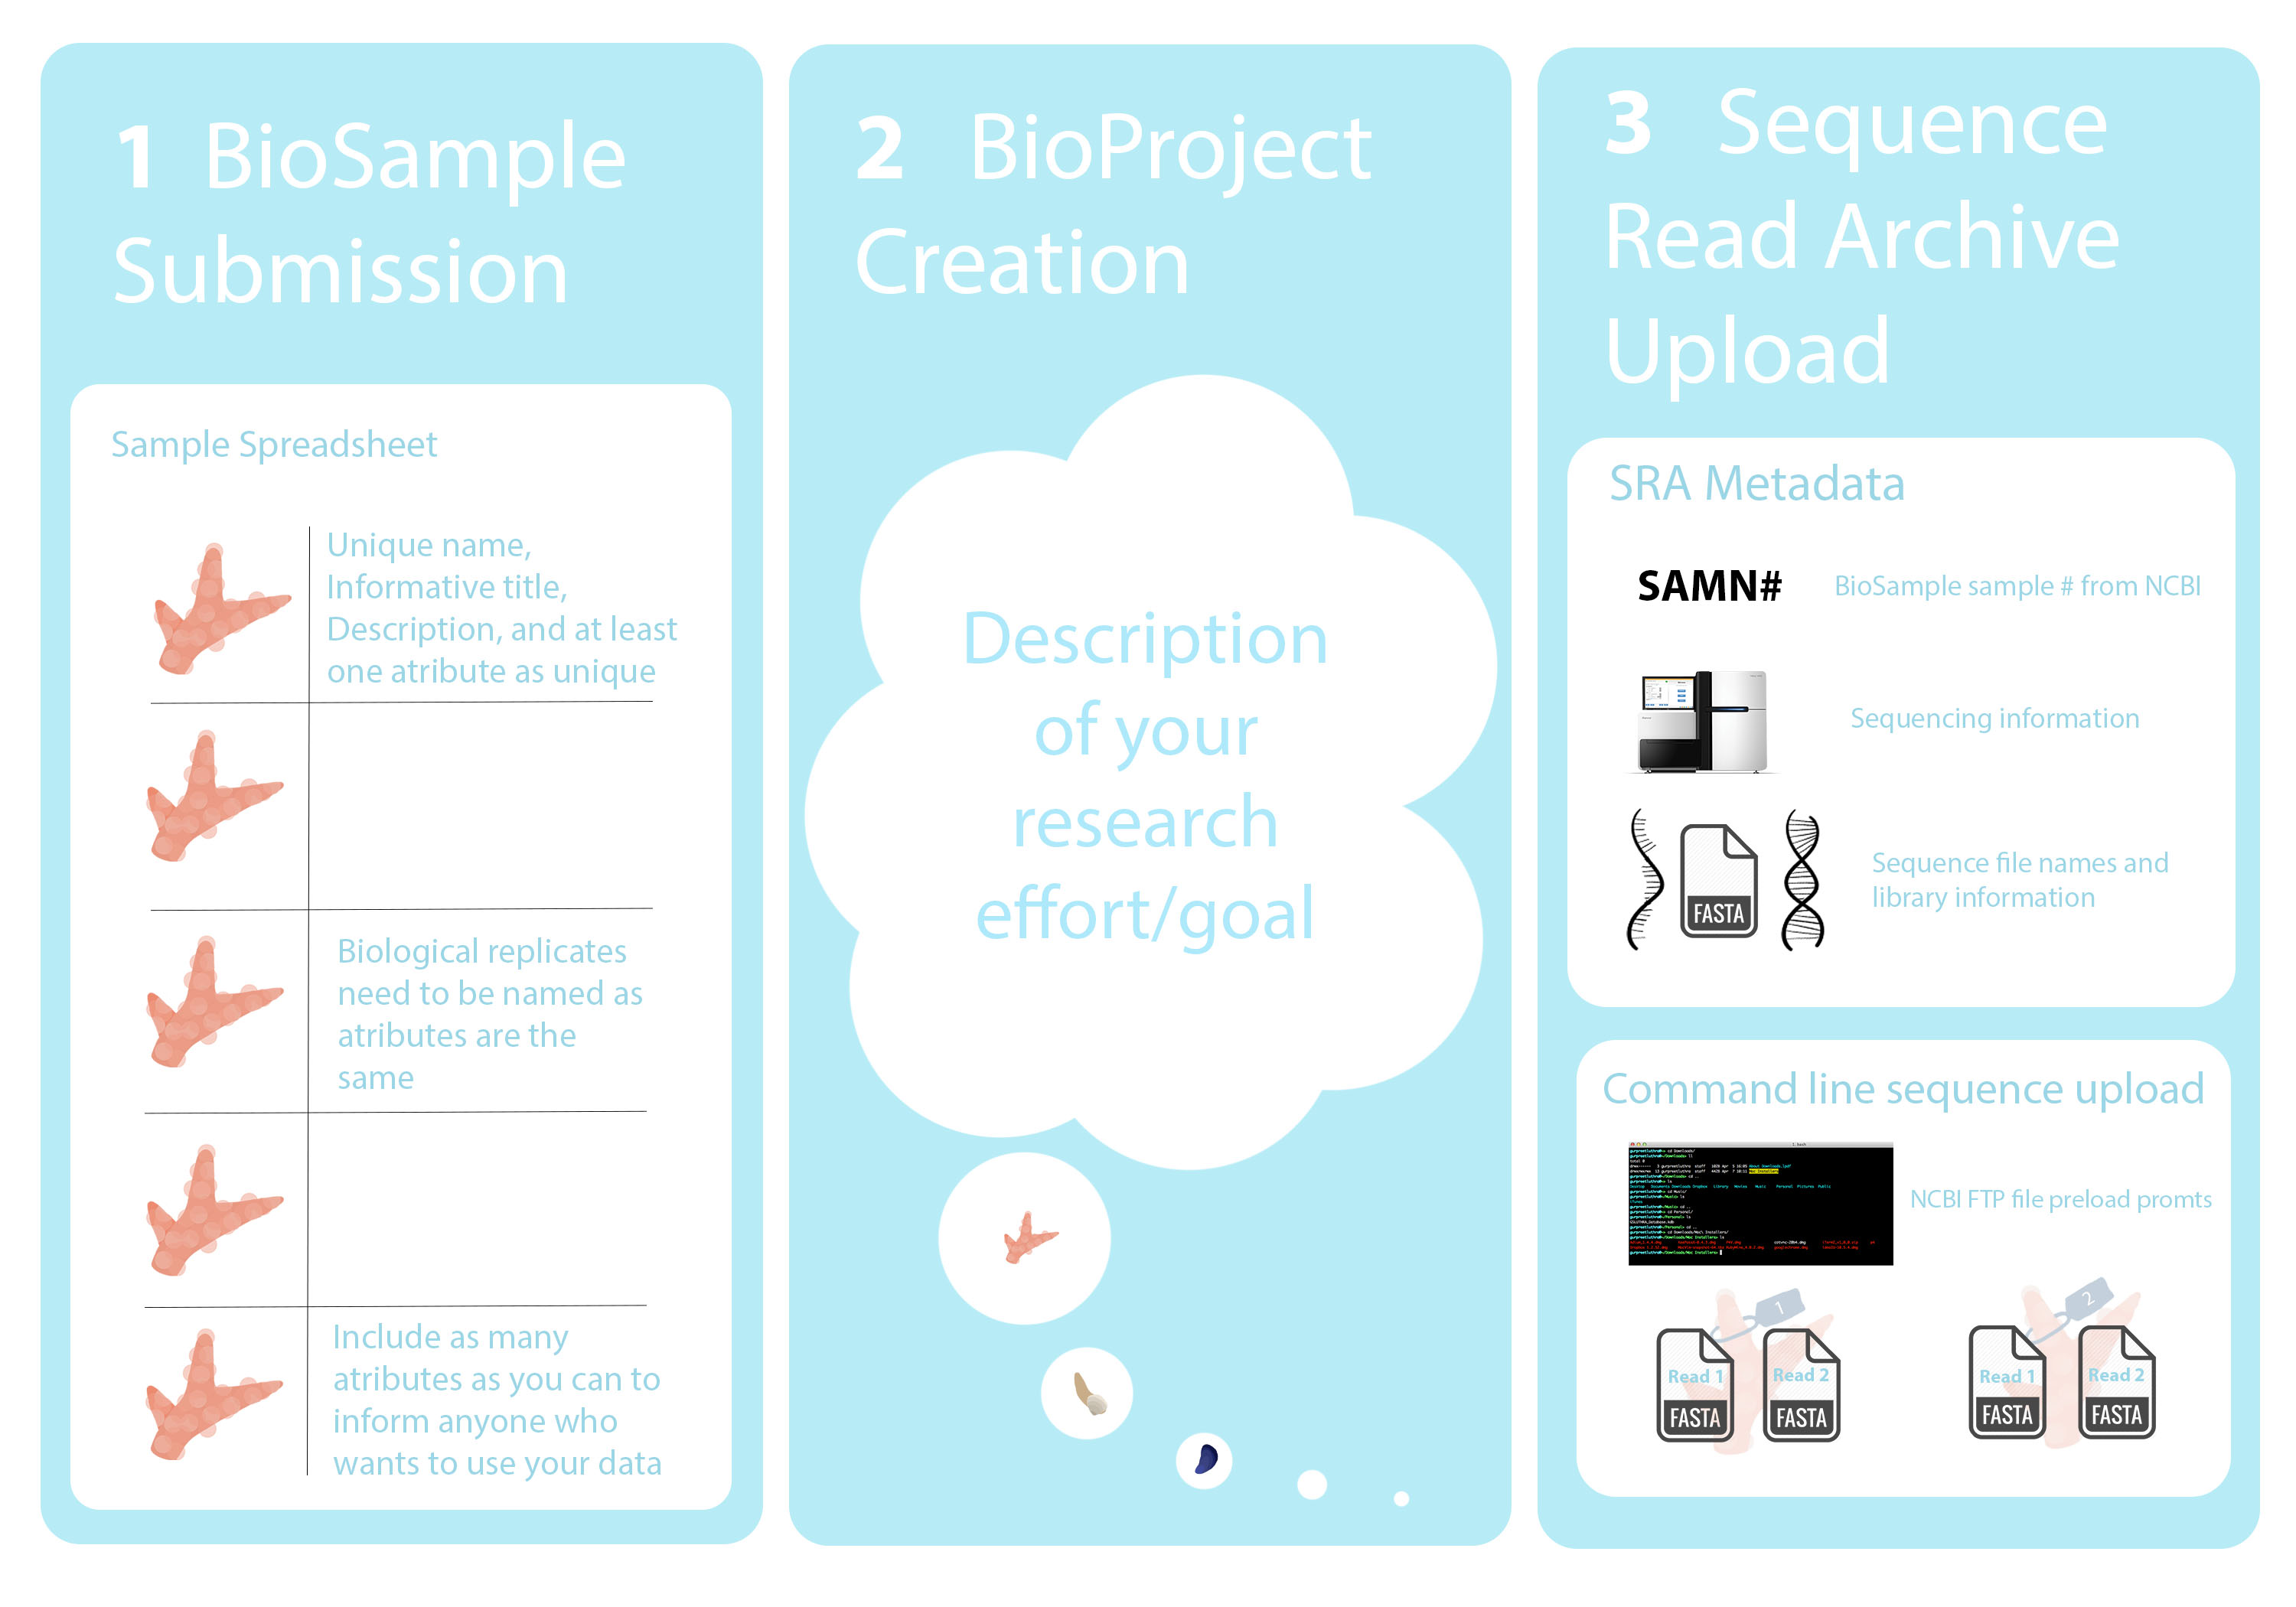
Information to gather before processing
- Species name and if there is any potential complications with that
- Who collected your samples (the organism) and the exact date
- The collection location (named location and latitude, longitude)
- How much of your organism was collected (whole body or certain tissues/organs)
- The batch that your samples were processed in (extraction, library, etc)
- All other potential metadata and characteristics specific to your samples: treatments, temperatures, biological replicates, developmental stages, genotypes, tank number, etc.
- The type of sequencing done for your upload
- The source of your nucleotide information (ie. RNA, DNA, metagenomic)
- How sequences were selected for library preparation (ie. restriction digest, PCR, PolyA enrichment, other enrichment or hybridizations, etc)
- How and by whom libraries were prepped, and what kit or method was used
- Sequencing platform (most likely Illumina)
- Which sequencing machine was used (ie. HiSeq #, MiSeq, NovaSeq, etc.)
- Whether your sequences are single or paired end
- Sequence file type
Once you have gathered those, the next thing to do is login to the submission portal for NCBI.
1 BioSample Submission
- Once logged in, click on the tab that says My Submissions.
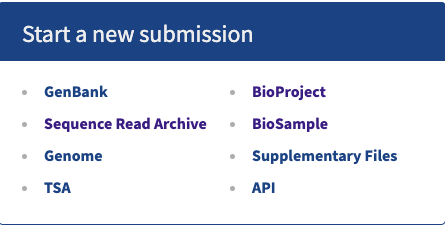
- In the Start a New Submission box, click on BioSample. This will take you to all your BioSamples.
- Right next to the blue box that says New Submission, click the link that says Download batch submission template.
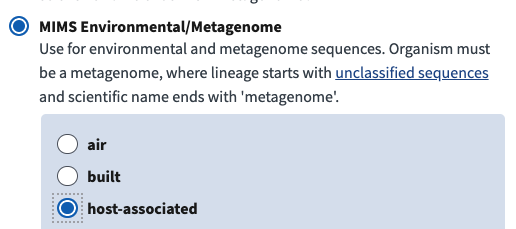
- Choose the sample type that your samples fit under. Most often it is invertebrate. However if you know these samples include/are for holobiont or microbiome or symbiont sequences you want to choose the MIMS Environmental/Metagenome host associated excel sheet
- Choose the Download Excel option for the template.
- All the examples in this workflow are going to be with the Invertebrate sample type. If you’re using the metagenome type most of these still apply, and other headings should be intuitive after looking through this.
- Components of the downloaded spreadsheet to fill out (bold means mandatory):
- Sample Name : unique name to identify your sample, can be abbreviated using consistent abbreviations from your data
- Sample Title : not required, but you should write out a more descriptive name for your sample from your sample_name because these will be the link title when these samples are on NCBI
- BioProject accession : you likely don’t have this yet, so leave it blank if there isn’t a project yet and it can be added in later
- Organism : full scientific name of species. If you are using the metagenome file, say metagenome here.
- Isolate, Breed, Host, or Isolation source : at least one of these is mandatory, if you don’t have information on these you can say not applicable, missing, or not collected, whichever is appropriate.
- Collected date : day the tissue/organism was taken
- Geo-loc name : Word description of location; Country : State/Province : City/locality
- Tissue : if no specific tissue type taken, whole organism is fine
- Attributes to include, none are mandatory but it is best to include as much information as you can to make your data reproducible. Additionally you need to make sure that at least one attribute field has something different for each sample otherwise you won’t be able to upload the file.
- Age
- Altitude
- Biomaterial provider
- Collected by : could be the same as above
- Depth
- Developmental stage
- Environment broad-scale : general biome description
- Host tissue sampled
- Identified by
- Latitude and Longitude
- Sex
- Specimen voucher
- Temperature
- Description : here is a great place to include unique descriptive statements that aren’t shared by any of the other samples
- Any other attribute you want to add : such as : pH, replicate, treatment, pCO2, date of spawning, etc etc
- I recommend saving your spreadsheet as something specific to this project so that it does not get confused later with other Invertebrate.1.0.xlsx sheets you download. ALSO You should always download a new sheet when you go to upload samples because NCBI could update the information they want since the last time you uploaded.
- Examples of a filled out and accepted BioSample spreadsheet. This can be tedious because it’s likely none of your other datasheets have things named this way so you may have to individually write out every cell for some columns.
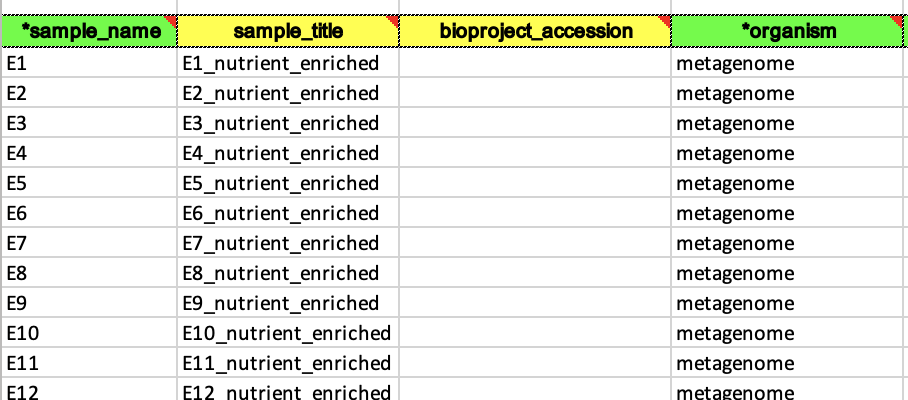
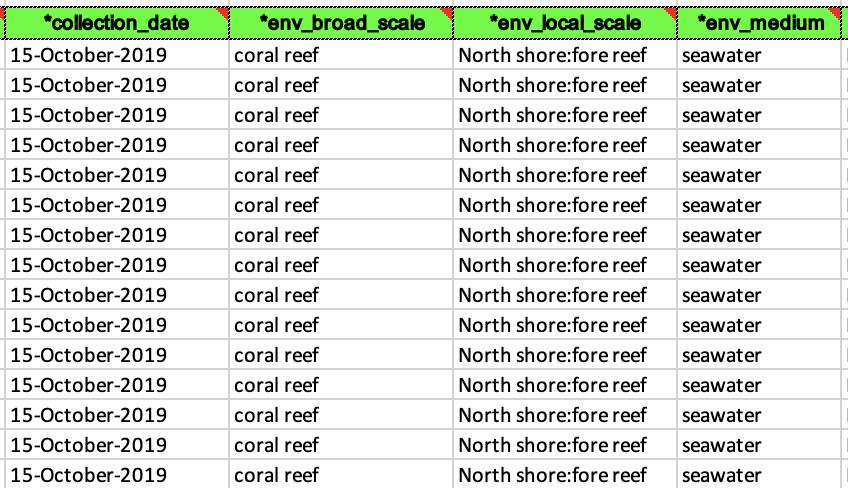
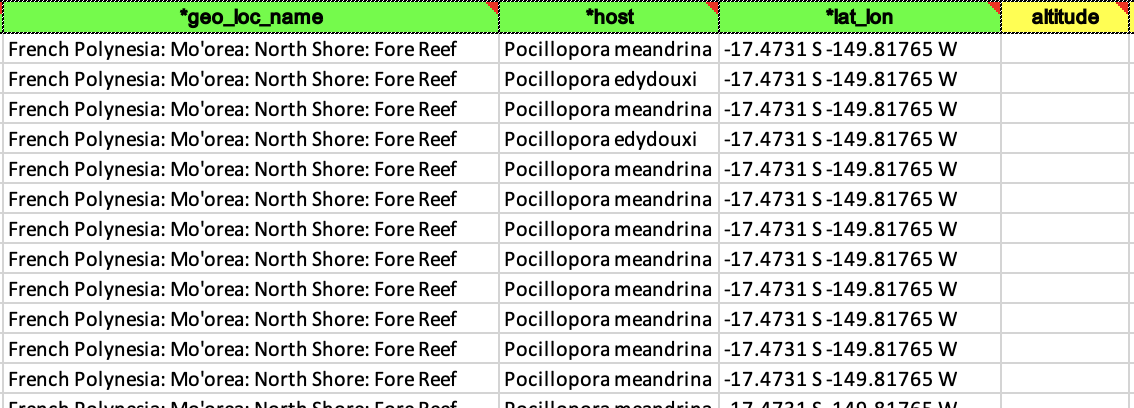


- Now you can go back to the BioSample submission portal and you are ready to click the blue box that says New Submission.
- The first section of the portal has submitter info. If in Hollie’s login there is nothing to change here so click to the next section.
- Choose when to release the BioSamples (and its associated data) and tell NCBI how you are uploading the info (batch).
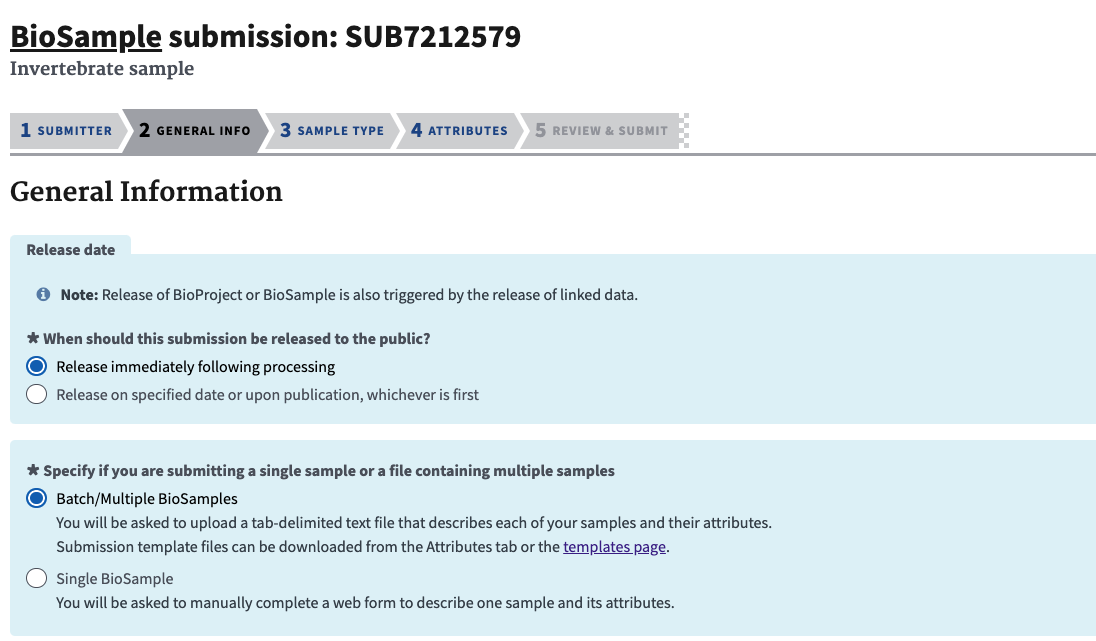
- In the next section choose the sample type, this needs to be the same as you chose above for downloading the template.

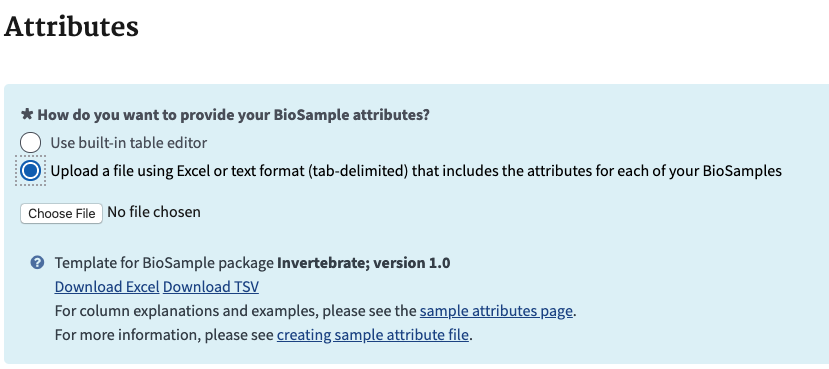
- In the next section for attributes, upload the excel file by choosing the file from your computer.
- When you click next here it will go through your excel file and make sure it has all the information it needs. If you get this error it means you did not provide one attribute field that is unique for each sample. This can be tough as we always have biological replicates in our experiments that are the same in all other ways. Look at the description attribute example above as an idea how to make each unique. You can always fix your sheet and upload it again.

- At any time you can leave your submission and come back to it in the submission portal, it saves for you
- Once the upload is ok, you review everything to make sure it’s what you want, then submit your samples!
- In the submission portal it will change the BioSample submission from in progress to processing. It doesn’t take very long to process the samples. Once they are processed, each BioSample now has an associated SAMN# with it.

- BioSamples are done!
2 BioProject Creation
- Go into the submission portal and this time choose BioProject in the Start a New Submission Box.

- Again the first section of the portal is submitter info. There should be nothing to change.
- Choose all types of data that are applicable for this project. Usually raw sequence reads is one of them. If you have metagenome or holobiont sequences then targeted loci environmental is they type of sequence for that (target loci as the amplicon).
- Choose the sample scope of the whole project, so be mindful if it is actually multi-species even though you are uploading data from one species at the moment.

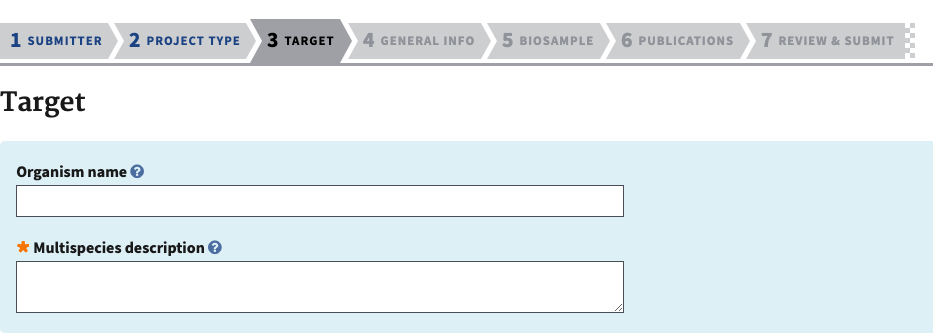
- The next section is target information. Add the species scientific name and add a description if there are specific limitations on that, ex. if there might be cryptic species, hybrid species, etc.

- If this is a multispecies project, the target information allows you to describe each species.
- The next section is for the project information. Release information should be the same as for the BioSamples. Create a descriptive and informative title, and give more information in the public description. It is important to see that it says public, so this description needs to be clear and informative enough for someone from the public to be able to understand the data from this project and know if they want to use it for their purposes. For relevance, choose one of these in the dropdown menu.
- Evolution
- Medical
- Agricultural
- Industrial
- Model Organism
- Other
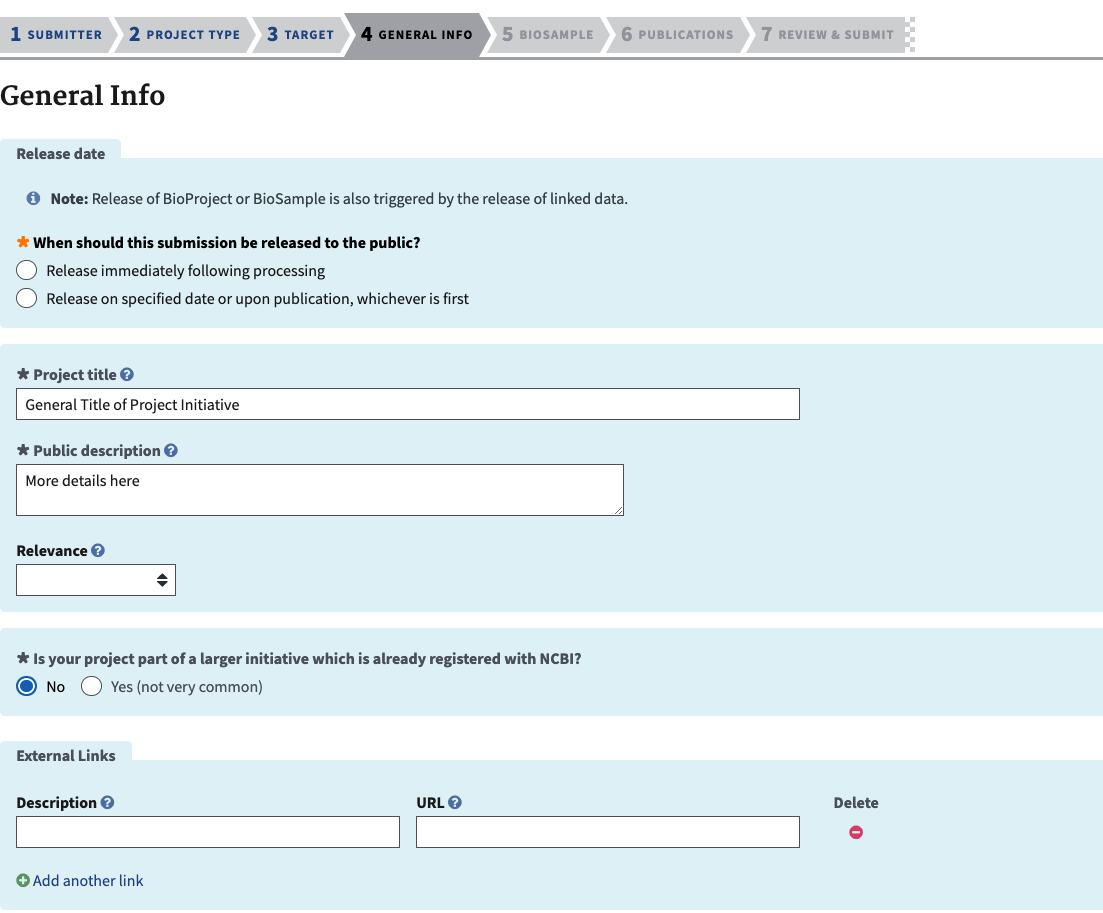
- If you know the Grant ID associated with this project, now is a good time to add it, although it can be added later. If this is part of a Consortium initiative include that information as well.

- The next section is to add the BioSample SAMN#s that you created above. This is why it’s easier to make these first instead of stopping in the middle of this submission to make them. If you make more later they can still be added in afterwards.
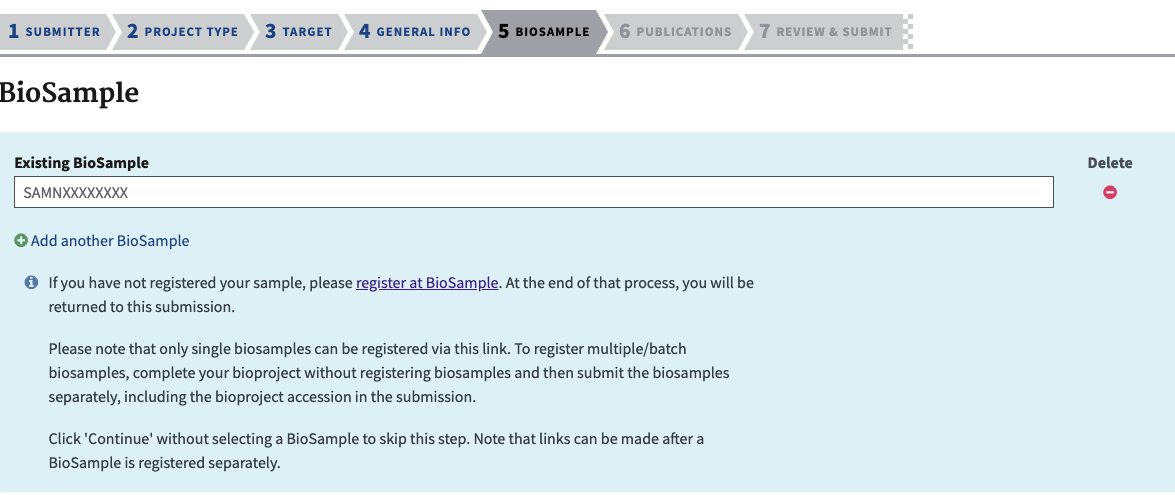
- When adding in the SAMN# it is best to have open in another tab the portal to your submissions and copy only the SAMN# from that list.

- Then paste the SAMN# into the portal for the BioProject. Wait a second or two until the number comes up in the drop down and click on it to choose that sample.

- It’s tempting to copy the whole name (ex SAMN14486766 : 128 FE LOW) and press enter, BUT notice that there is a space between the : and the SAMN# on the submission portal, but not in the dropdown in the upload section. If you don’t choose from the drop-down option, NCBI will not recognize the SAMN# and that sample won’t be added to the list. You will get an error like this. So only copy and paste the SAMN# and wait to click the option. Yes, this is tedious.

- The next section is for publications info. If there hasn’t been any publications yet with this data you don’t need to add anything.
- Then you review all of your inputs and submit! Once again the submission needs to be processed. Once it is processed you will have a PRJNA#.
3 SRA Sequence Upload
- Finally! Start a new submission for a Sequence Read Archive.

- We will be doing the ftp upload, so make sure you can access your sequence via the command line
- Again, the submitter info is the first step and shouldn’t be changed.
- For information, paste in your new PRJNA# and say yes you have BioSamples (these will be added in the metadata sheet). Then choose the release data option that fits will all your other submissions.
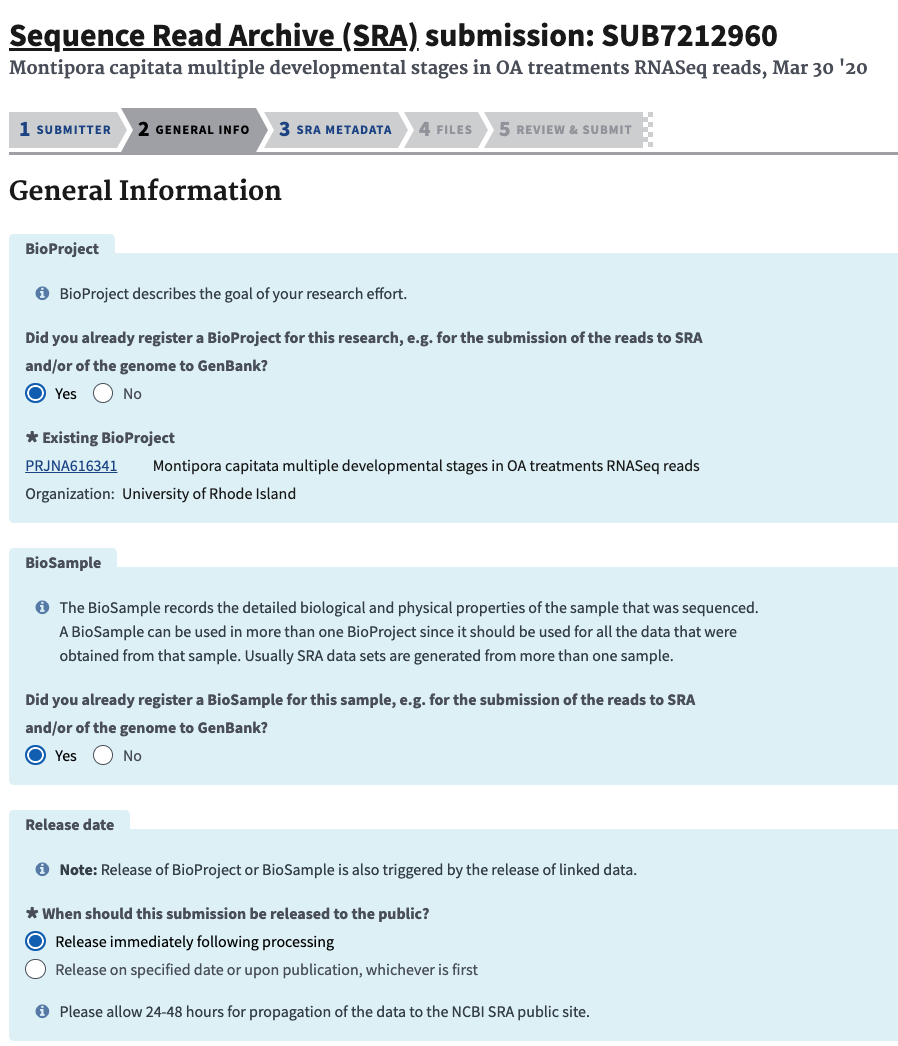
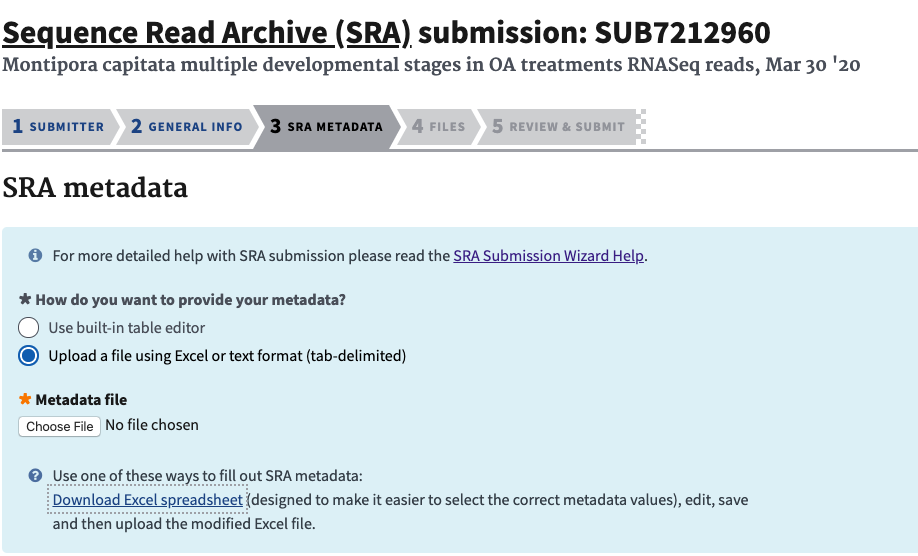
- Next, for the metadata upload choose the Excel format and download the excel spreadsheet from NCBI.
- In the excel sheet, the first tab is general instructions about the file, the second tab is where you input your information. The third tab is all of the terms that can be used for Strategy, Source, Selection, and Platforms, as well as definitions of what they are (you should know these before hand, see information to gather before processing).
- In the first column add the SAMN# so NCBI can connect this data with the other information you have already put together.
- The SAMN# does not have information about your samples though, so in the library_ID include your sample number and identifying information (as in the BioSample_name) as well as the sequencing type as there might be multiple of those per sample. These will be the titles of the links on NCBI to your sequences.
- In the next column include a more descriptive title for each sample.
- Then in the next columns you need to add the sequencing information. These should generally be the same for all your samples if they were sequenced together. The answers to these are from the drop-down menus in each cell only. Look into the third tab of the spreadsheet for all options and definitions to choose the best one.
- Library strategy
- Library source
- Library selection
- Library layout
- Sequencing platform
- Sequence instrument model
- Sequence file-type
- The design description column is where you should put all information about how the libraries were prepped, what method, and by whom.
- Then, in the filename column add the Read 1 complete file name. If you have paired end sequence data, add Read 2 in the filename 2 column of that same row. *note: make sure that your files are zipped with gzip and note zip.
- Examples of a filled out and accepted SRA metadata sheet:
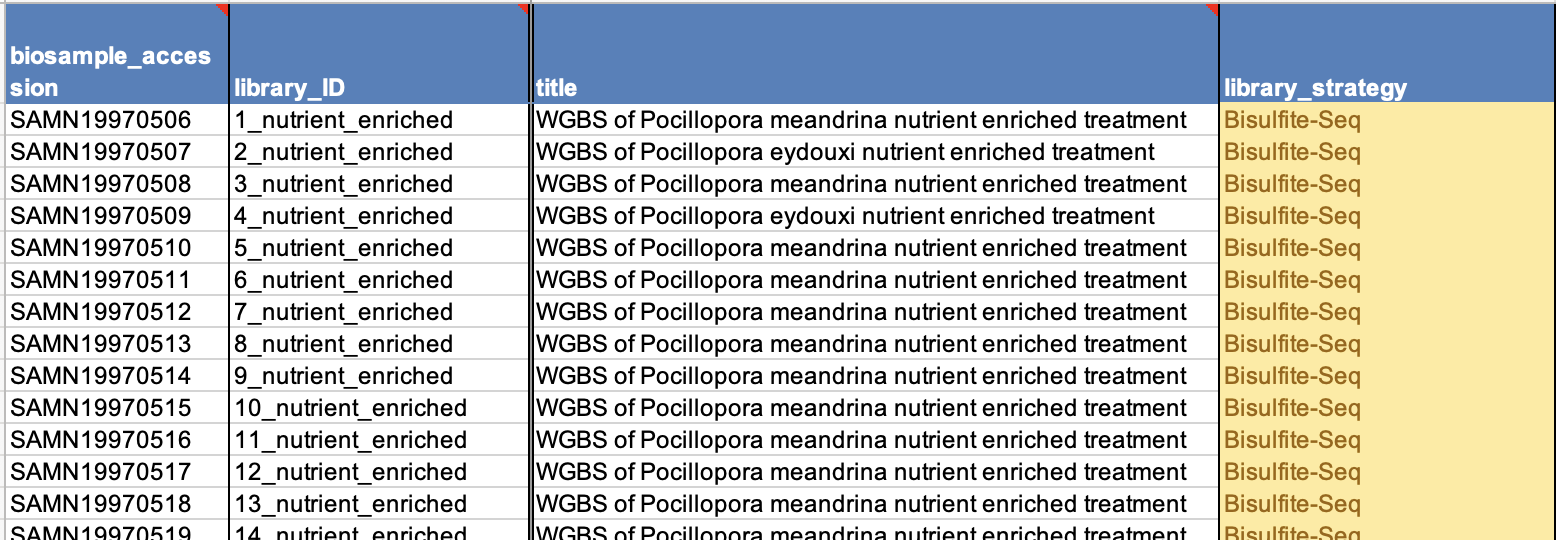
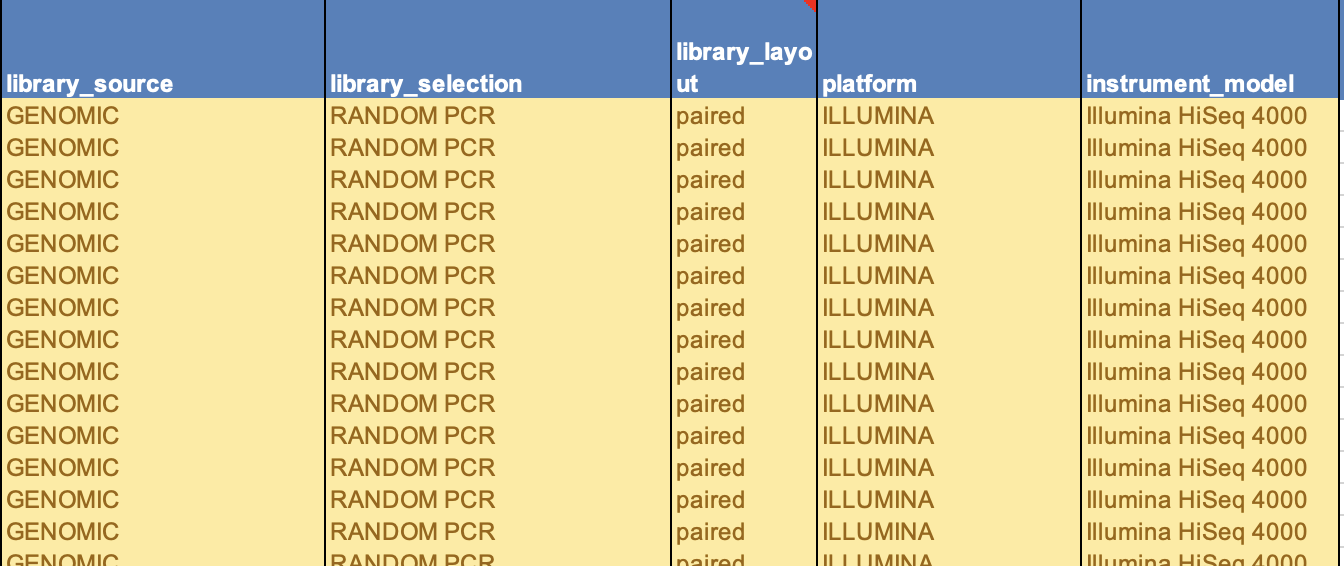

- Please triple check that your file names match your sample number and matches your SAMN#. This is the most crucial. It is best to always stay in numerical order to help alleviate confusion, especially when you have to copy and paste single cells, or write out names completely.
- While on the SRA_data tab choose Save As in a tab delimited format, such as .txt or .tsv. This is the formatted required by the upload portal.
- Then choose the tab-delimited version of the file for the metatdata upload in the SRA submission portal. It will check that everything is in the right format and flag you if something needs to be changed.
- Next you go to upload your files. Choose the FTP command line preload option and click the button to request a pre-load folder.
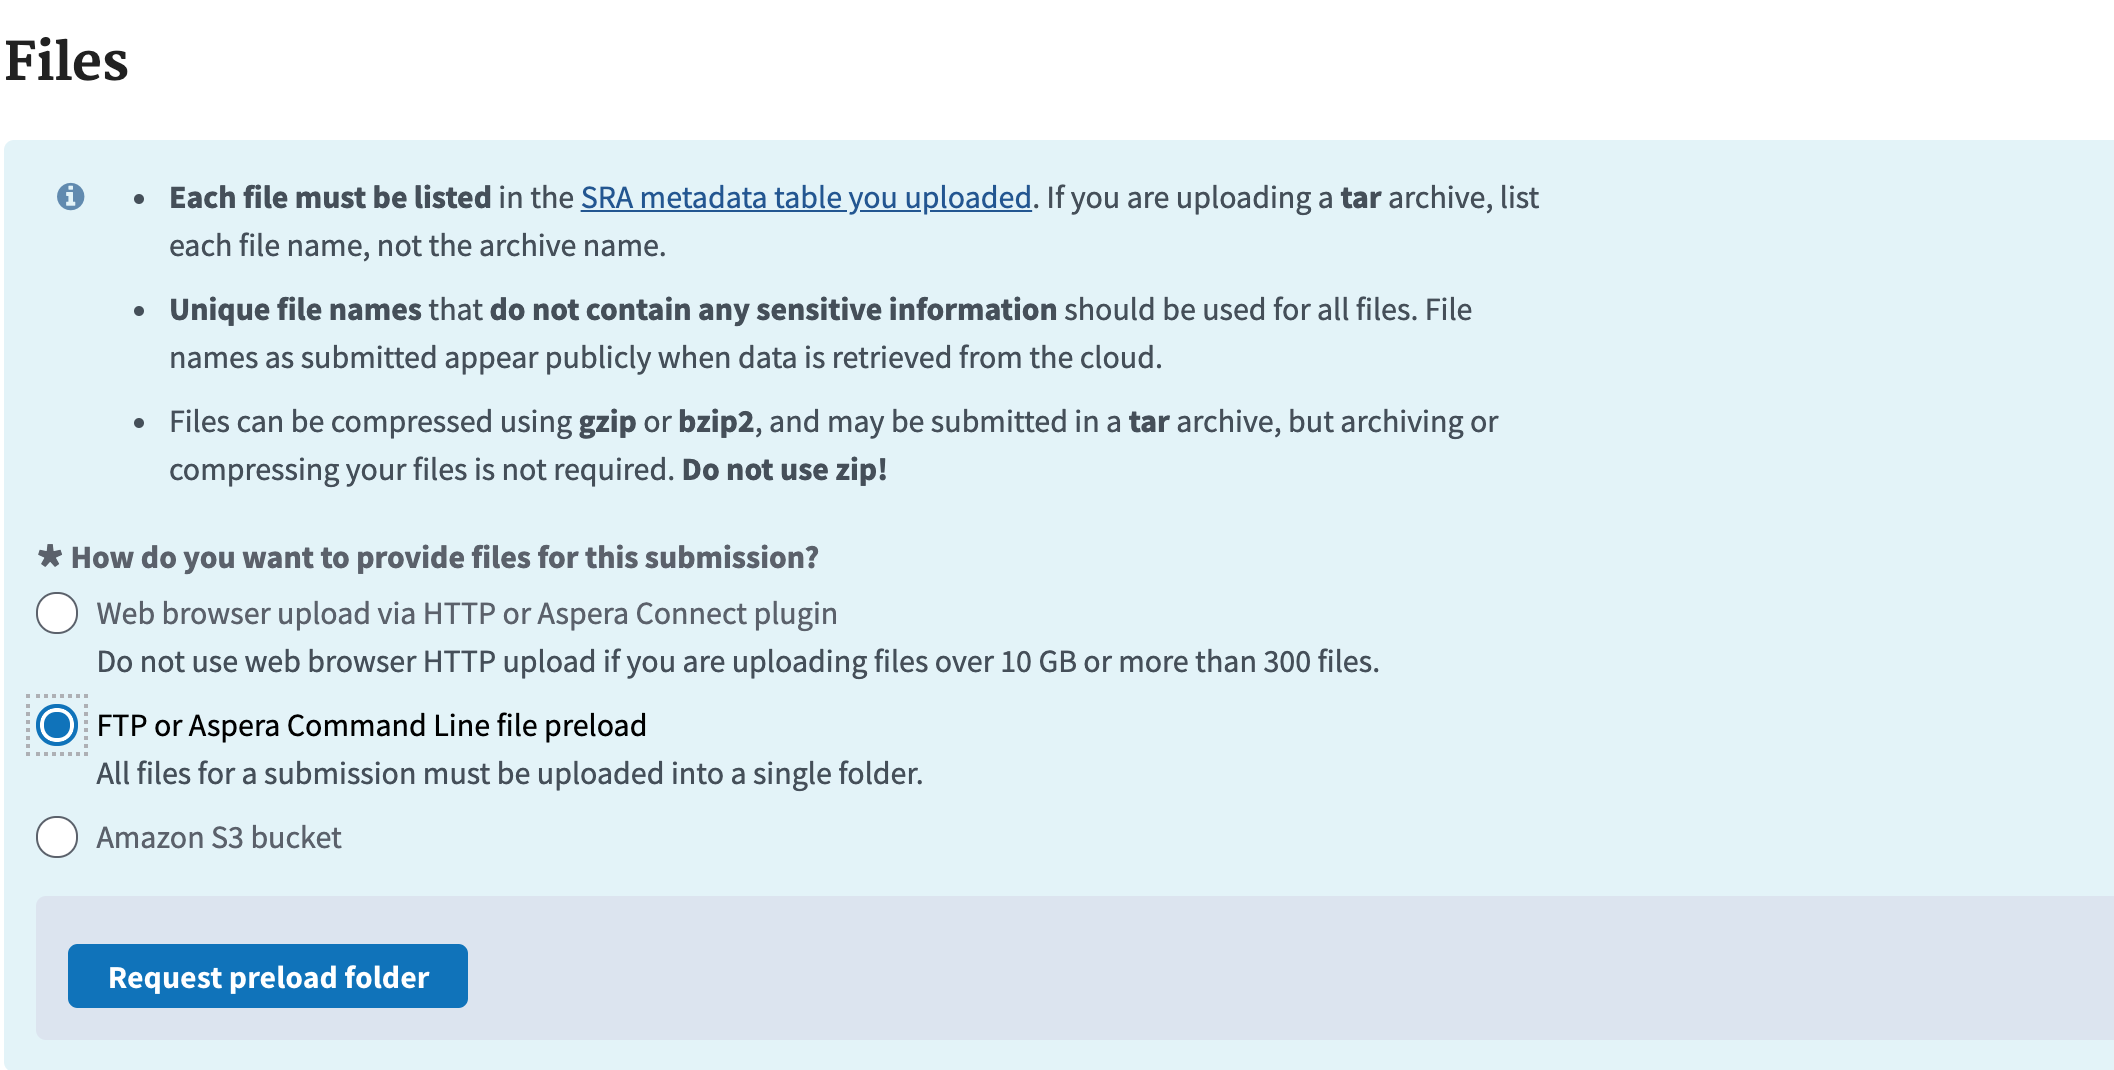
- Then you have to choose what type of instructions to use. Click the FTP upload instructions and it will give you some command prompts that I will go into more detail with here.
Instructions on how to connect to the NCBI SRA server using Andromeda
- First, in your terminal connect to your Andromeda account. Go to the directory that contains your raw data (usually fastq.gz) files. If there are other files not being uploaded, either remove them or create a new directory that only contains the sequence files you are going to upload.
- FTP, or File Transfer Protocol, lets you access a folder for NCBI and your directory at the same time just for the purpose of transferring files. I noticed that this FTP is not functional on Andromeda so we will be using a different command called NcFTP which is an alternative to the standard FTP program to connect.

- While you are in the Andromeda directory with your files, invoke the NcFTP command instead of FTP. To start the process by type:
ncftp -u 'username provided through NCBI for you' ftp-private.ncbi.nlm.nih.gov
- Notice that your command prompt now changes to
ncftp> - Now you want to login to NCBI using the address they give you. This command will allow you to enter the username in one line and it will prompt you for your designated password.They only give you 30 seconds to do this so make sure you are ready to C+P.
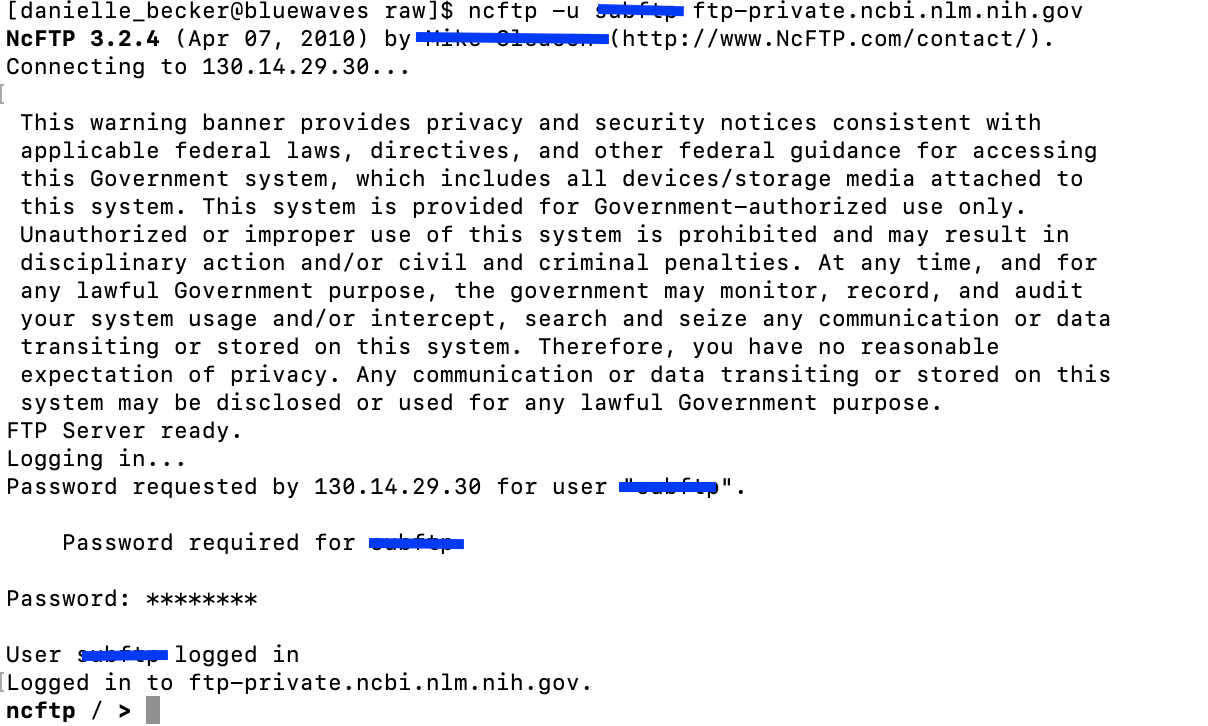
- Once you are logged in,
cdinto the account folder given to you by NCBI

- Create a new directory for your files with
mkdirthencdinto that new directory.

- Then you copy the files from your directory into the remote FTP NCBI directory. You could use the
putcommand to choose one file at a time, but using themputcommand along with the.to specify “all files in this directory” is much easier. Simply type in and enter to start copying all files:
mput *
- You will then see it start uploading the files. See example command line interface in the middle of uploading:

-
This can take a while, depending on how many files you have and how large they are. When it is finished copying you will see the command line prompt go back to
ncftp>. - Once that’s done, you can go back to the submission portal and Select Preload folder. If your folder hasn’t shown up yet, wait another 10 minutes and keep refreshing the folders. It can take time. Then select your folder and click use selected folder.
- Then, you review all your information, make sure all the files are there and submit!!
Note: It can take over a day for your sequences to show up on NCBI
What Everything Will Look Like on NCBI
BioProject Under NCBI BioProject. All information on the project is here, as well as the links to the BioSamples and the SRA sequences. Those links are the little 48 numbers.
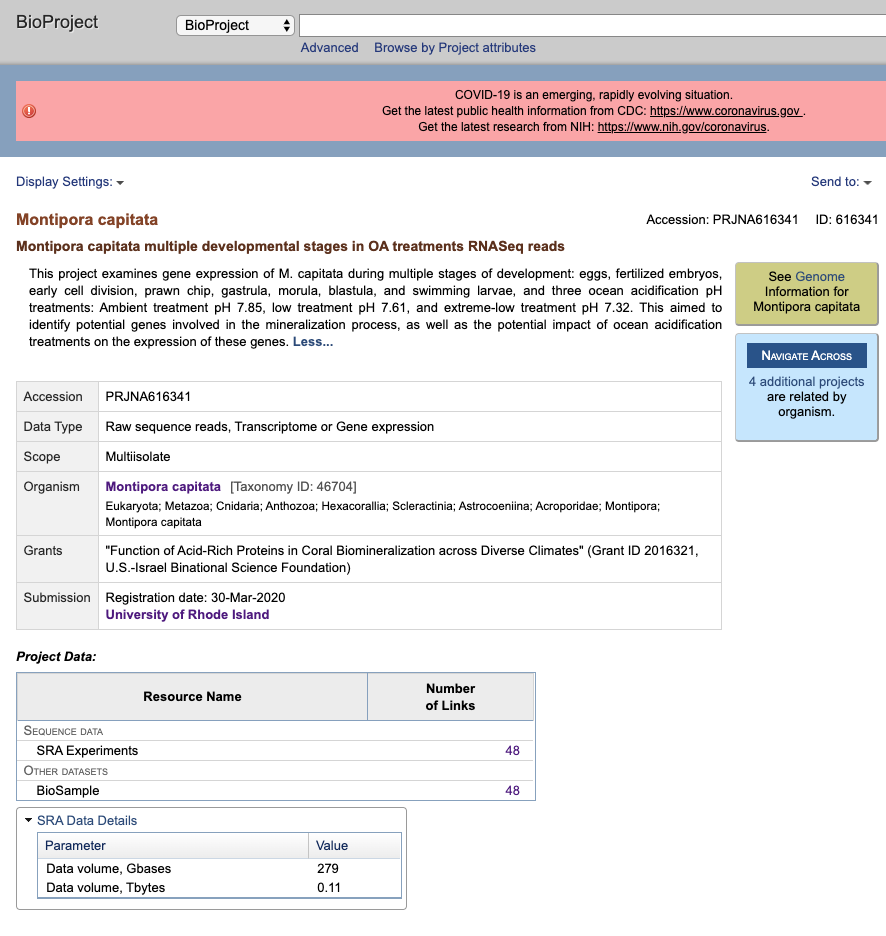
If you click on the 48 next to BioSamples, it will list all BioSamples associated with the BioProject.
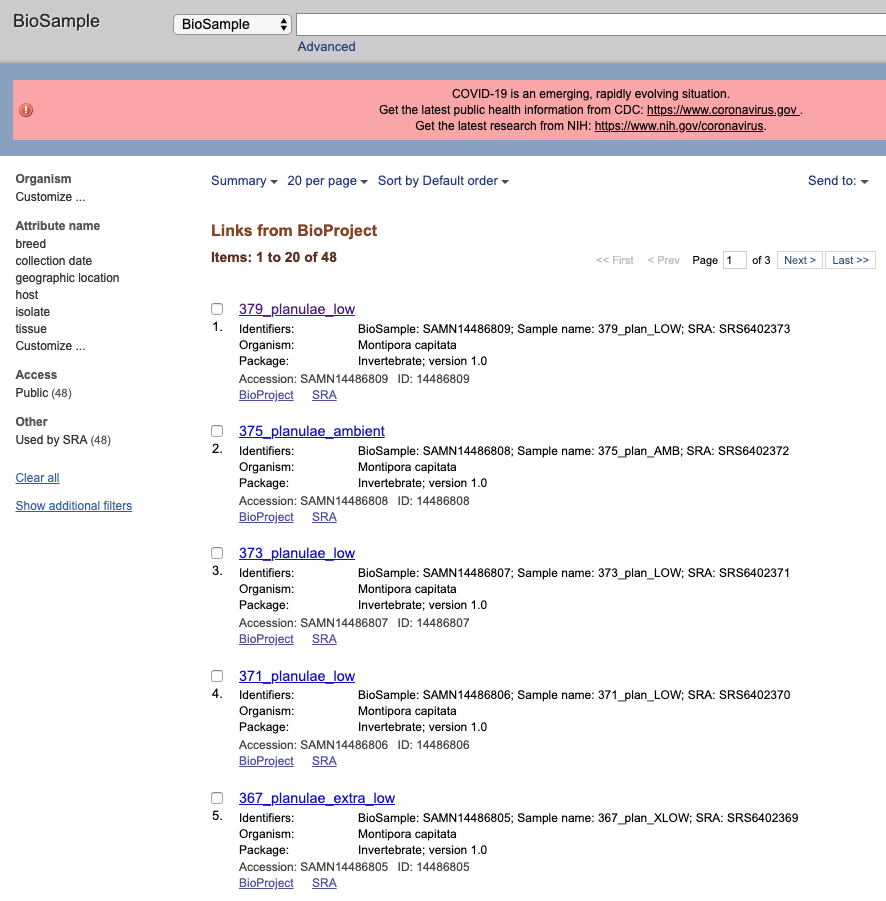
If you click on one sample it will take you to the page for that specific sample. Here all the attributes are listed, every associated accession number, and links back to the BioProject and to the SRA submission for this sample.
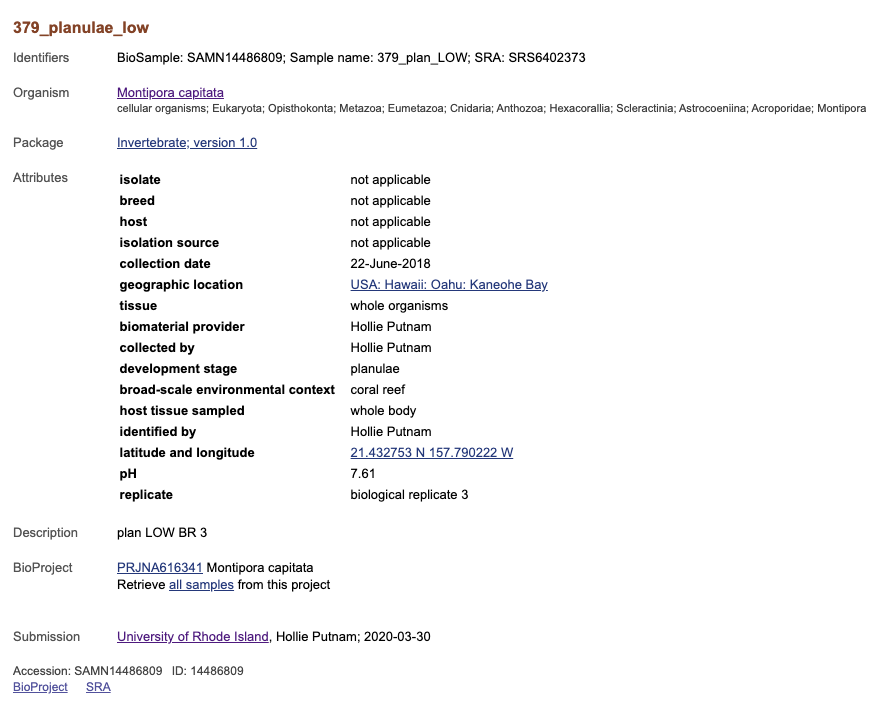
If you click on the tiny link that says SRA at the bottom of the BioSample page it will take you to the SRA page for this sample. It will tell you all the library and sequencing information, as well as how much data you have.
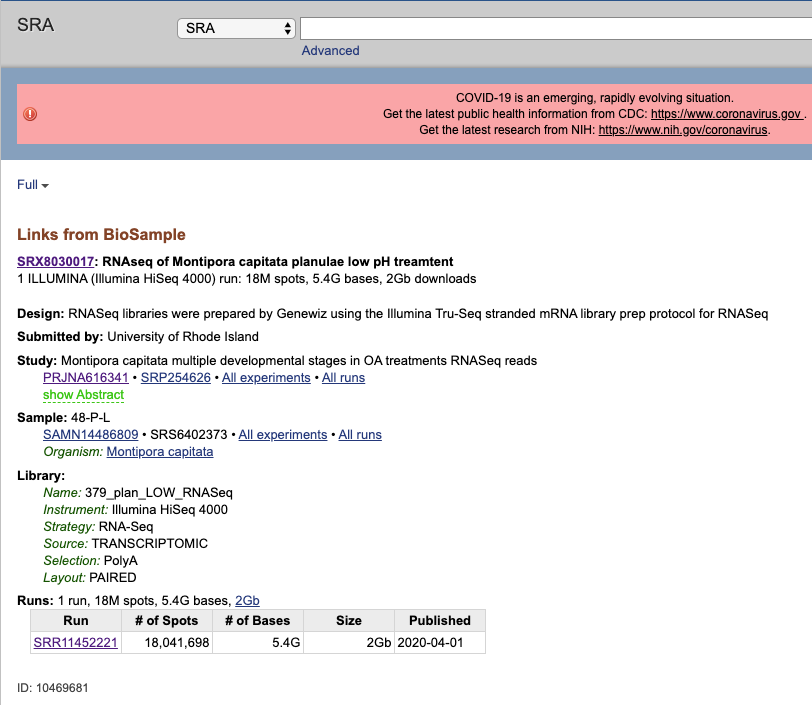
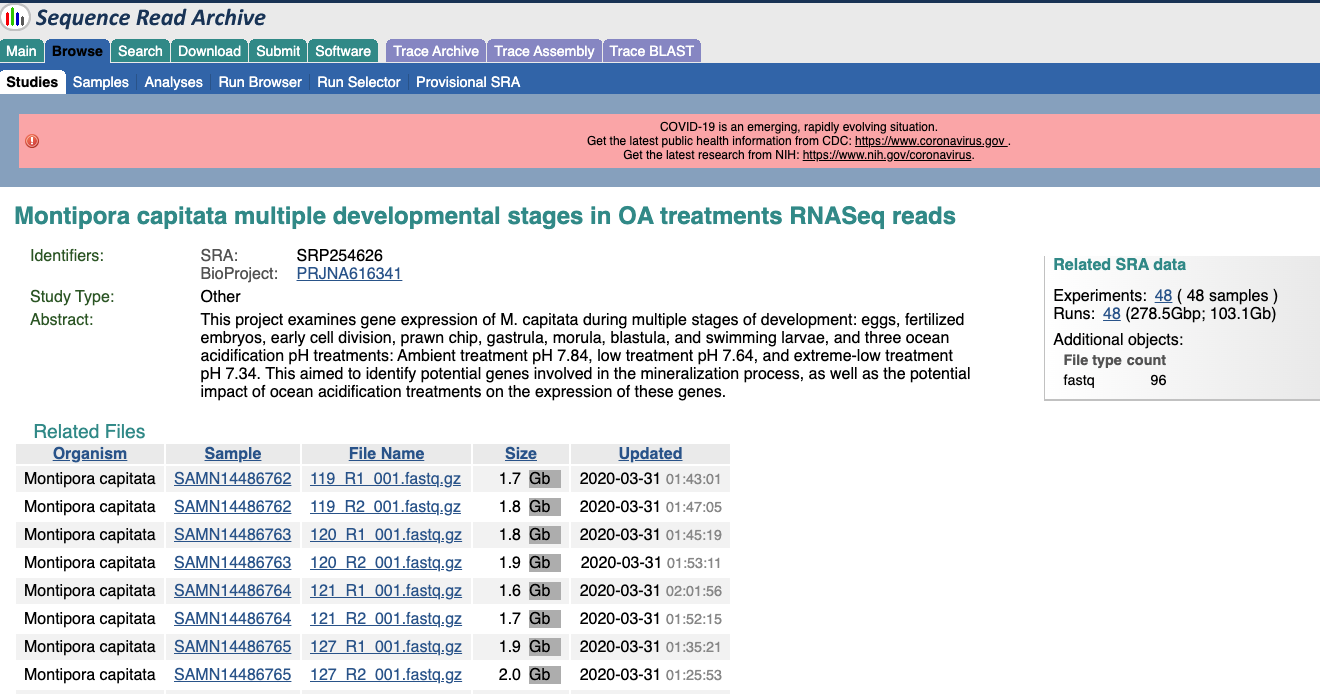
From here you can go back to the BioProject by clicking it’s accession number, or see a list of all the sequences by clicking the SRP number.
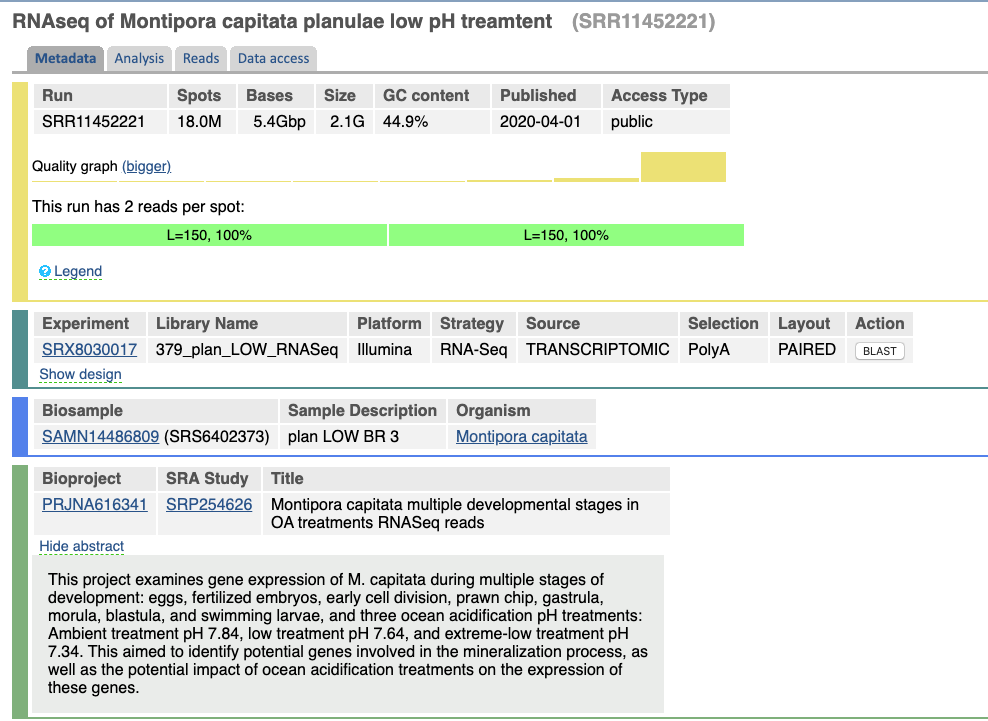
If you wanted to look at just the sequences that are linked to that BioSample, click on the Run SRR number that’s in the table with the sequence size information. Here is all of the information about these sequences, you can actually look at some of the reads, and there is a tab for accessing the data.
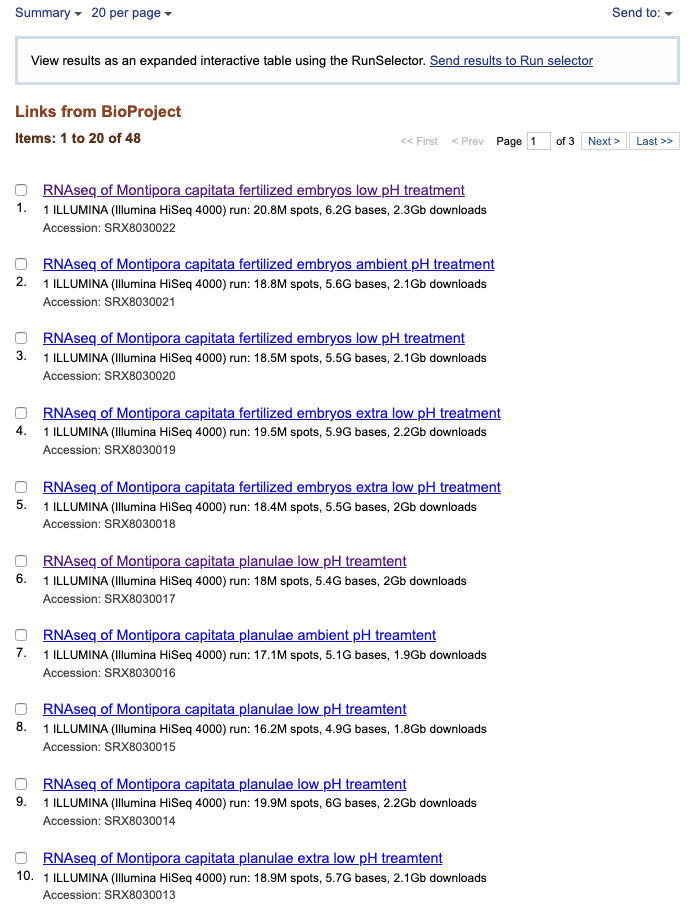
Additionally, you can get a list of the SRA sequences by clicking the little 48 next to SRA on the main BioProject page.
Links to NCBI pages that try to tell you how to do this but aren’t very helpful. They also aren’t well linked together. A lot of the information about BioProjects and BioSamples come from pages about SRA information.
- BioProject Overview
- BioProject FAQ
- BioSample Overview
- BioSample Submission FAQ
- SRA Submission QuickStart
- BioProject and BioSample Information
- SRA File Format Guide
- SRA MetaData Overview
- SRA File Upload Information
- SRA FAQ
- SRA Submission Guide (different than quickstart, why!!)
- SRA Troubleshooting
- Updating SRA Data
